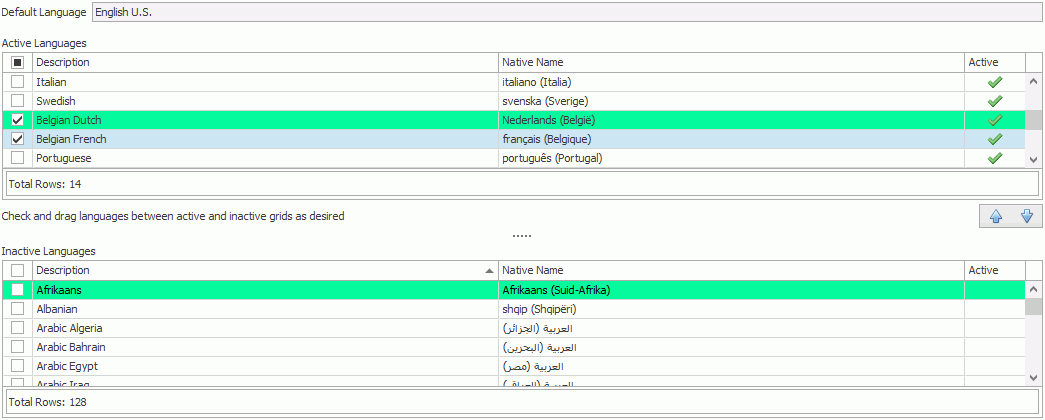
When a database is created the default language is English. This can be changed by modifying the default_language_id entry in the global_settings table. This must be done before any data is entered in the database otherwise issues may occur.
Modify List of Available Languages
The list of languages that can be made available is pre-set. If an additional language is needed, contact ATS Support.
To make the language selection quicker you can specify which languages will be displayed.
Select the Management tab.
Click Languages.
The Languages window is split into two panes. The upper pane contains the languages that are currently available when creating an item. The lower pane contains the languages that aren't currently available.

To make languages available for selection enable the check boxes next to the languages in the lower plane.
Drag and drop the selected languages to the upper pane.
The languages are now available when creating or editing items.
Use the arrow buttons to re-order the list. This is the order in which they will be displayed to the user.
For information on using multiple languages when creating or editing an item see here.
Modify and Translate Application Text
The following applications and items contain text that can be modified and translated. They're split into three groups:
Reports
CAP Comment Types
Translated text can be viewed by users that have that language selected within their profile.
Modify text and add translations as follows:
Select the Management tab.
You can now choose from the following options in the Vocabulary section:
Click Report to modify and translate text in reports.
Click CAP Comment Types to modify and translate the descriptions of static tables such as Defect Status, Repair Status, etc.
The list of text that can be translated in that application or item is displayed.

Expand text items to see the translations that have already been entered.
Select a text item.
Click the Edit button ( ).
).
A new dialog opens.
Modify the text as required. Extra languages can be added by selecting them in the drop-down list and clicking  .
.
Click OK.
The changes are saved.
Carry Out Bulk Translations
Translations of the application content can be performed in bulk by a form that utilises Google Translate. Translations for every translatable item at the click of a button. You can then go through the list and make updates as required.
Select the Management tab.
Click Bulk Translation.
Select an Entity (e.g. color, detail) from the drop-down list. All of the descriptions for that entity will be listed.
Select which languages you want to translate into using the Languages drop-down list.
Translate all of the descriptions by clicking Translate above the required language.
The descriptions are sent to Google Translate and the results are then displayed in the column for that language.
Check through each item and manually modify any items that require it.
The translations will now be available to anyone using that language.
Specify a Language for a User
To display buttons, parts, components, and other items in an operator's native language when collecting data, you can specify the language to use as part of the user's profile. After specifying a user's language, the administrator must provide the translated terms for each of the elements that should appear in the user's native language.
A language is assigned to a user in Security Manger.
Refer to the Security Manager section for further information.
Once it has been updated, when the user next logs in to his/her station, the native language equivalents appear. Items that do not have a translation appear in the default language, flagged with an asterisk.